No Products in the Cart
Choosing the right mig schweißen gas (MIG welding gas) is like picking the right gear for a climb—it’s the invisible force that makes the difference between a strong, clean weld and a porous, brittle failure. This gas creates a protective bubble around the molten weld pool, shielding it from the harmful effects of oxygen and nitrogen in the atmosphere.
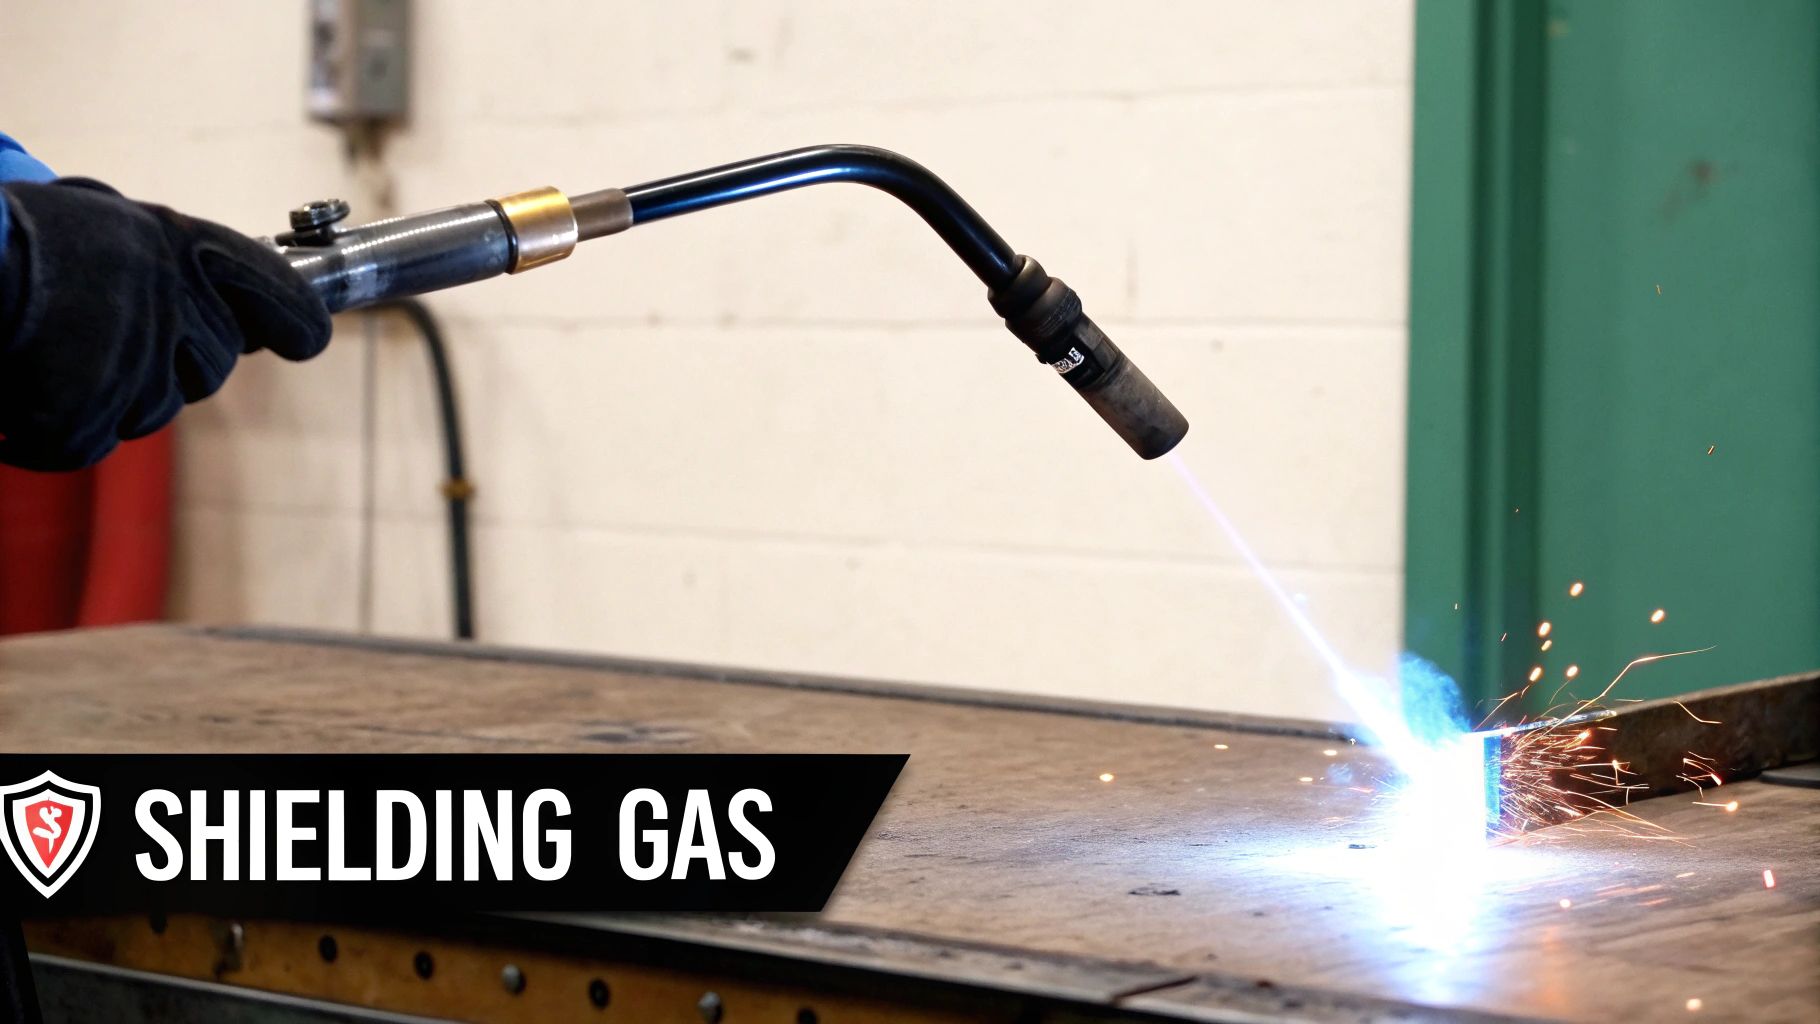
Imagine trying to paint a masterpiece outdoors during a dust storm. No matter how skilled you are with a brush, the final piece will be a gritty mess. Welding without the proper shielding gas is the same story; the surrounding air rushes in and contaminates the molten metal, ruining the integrity of your work.
At its core, the job of your mig schweißen gas is to displace the everyday air, which is roughly 78% nitrogen and 21% oxygen. Without this protective bubble, these atmospheric gases would eagerly react with the hot metal, leading to defects like porosity (tiny gas bubbles) that weaken the final bond.
The world of shielding gases splits into two main families, each with a very different job to do. Getting this distinction right is the first step toward mastering your welds.
Choosing between an inert or an active mix is crucial. Use an active gas on aluminium, and you’ll create a mess of unwanted chemical reactions. Use a purely inert gas on thick steel, and you might not get the deep penetration needed for a truly strong joint. To dive deeper into how these gases work, you can explore our detailed guide on shielding gas for welding.
The selection of a shielding gas is not just a technical detail—it is the foundational decision that dictates the quality, strength, and appearance of the final weld. Getting it right prevents costly rework and ensures structural integrity.
This process, formally known as Gas Metal Arc Welding (GMAW), is a cornerstone of modern fabrication. In German manufacturing, the MIG/MAG process is dominant, and it's projected to account for around 38% of the welding machinery market share in Europe by 2025, largely driven by the industrial and automotive sectors.
Think of your shielding gas not as a single ingredient, but as a specialised toolkit. For any mig schweißen gas job, you're really working with four main components: Argon (Ar), Carbon Dioxide (CO2), Helium (He), and Oxygen (O2). Getting a feel for the unique personality of each gas is the secret to laying down strong, clean, and predictable welds every time.
Instead of getting bogged down in complex chemistry, let's focus on what each gas actually does to your arc and the molten weld pool. Each one shapes the final result in a different way, influencing everything from the smoothness of the bead to how deep the weld penetrates.
Argon (Ar) is the cornerstone of most MIG welding gas mixtures, especially when you're working with non-ferrous metals like aluminium. Being an inert gas, it doesn't react with the molten weld pool at all. Its main job is to create a calm, stable, and focused arc that’s incredibly easy to control.
Imagine trying to spray a fine mist from a garden hose. Argon acts like a nozzle that creates a narrow, focused stream. Other gases might create a wider, more chaotic spray. This tight arc profile gives you a clean weld with very little spatter, making it the undisputed champion for materials like aluminium and magnesium.
The only catch? On its own, Argon doesn't produce a particularly hot arc. While that's great for thinner materials, its lower thermal conductivity can lead to shallow penetration on thicker steel. Sometimes, this causes the weld bead to just sit on top of the metal rather than properly fusing deep into the joint.
Carbon Dioxide (CO2) is an active gas and the absolute powerhouse of MAG welding for steel. It's also significantly cheaper than Argon, which makes it a go-to choice in production shops where every penny counts.
Unlike Argon's calm demeanour, CO2 creates a much hotter, more energetic arc. This happens because CO2 molecules actually break apart in the arc's intense heat, releasing extra energy and cranking up the temperature. All that added heat results in a wider, deeper penetration profile—perfect for getting strong welds on thick steel.
The trade-off for all this power is a less stable, more turbulent arc. Welding with 100% CO2 usually produces more spatter and a rougher-looking bead compared to an Argon blend. This aggressive nature takes a bit more skill from the welder to manage, but for heavy-duty steel fabrication, its deep-digging power is undeniable.
While pure CO2 is a budget-friendly option, its aggressive arc can be a challenge. For most steel applications, blending CO2 with Argon strikes the perfect balance, giving you the deep penetration of CO2 with the smooth stability of Argon.
Helium (He) is another inert gas, but it behaves completely differently from Argon. The best way to think of Helium is as a turbocharger for your welding arc. It has a much higher thermal conductivity, meaning it transfers heat into the workpiece far more efficiently.
This trait makes Helium invaluable when you need to weld thick sections of non-ferrous metals like aluminium or copper. These materials are notorious for sucking heat away from the weld zone. The extra energy from a Helium-spiked arc helps keep the weld pool fluid and ensures you get proper fusion.
Helium's main drawback is its cost. It’s also a much lighter gas, so you need a higher flow rate to provide the same shielding coverage as Argon. For these reasons, it's typically reserved for specific high-performance applications where the benefits truly justify the higher expense.
Oxygen (O2) is an active gas that's used in very small amounts, typically 1-5%, mixed into an Argon base. It might sound odd to add oxygen—the very thing we're trying to shield against—but in carefully controlled doses, it's a valuable "secret ingredient" for welding steel.
Adding just a tiny bit of oxygen makes the weld pool much more fluid. This helps the molten metal flow better, giving you a smoother, flatter weld bead that "wets in" more effectively at the edges (what welders call the toes of the weld). This improved wetting action seriously reduces the risk of undercut, a common and problematic weld defect.
It's a delicate balancing act, though. Too much oxygen will cause excessive oxidation and porosity. It's only suitable for plain carbon and low-alloy steels and should never be used on aluminium, magnesium, or copper. Once you understand these four fundamental gases, you can start to see how different blends are engineered to get specific results on different materials.
Now that we’ve broken down what each gas brings to the party, we can get practical. Choosing the right mig schweißen gas is a bit like a chef picking spices; the right blend makes the dish perfect, but the wrong one can ruin it entirely. The first and most important factor is always the metal you're welding.
Every metal has its own personality—its own melting point, how it handles heat, and how it reacts chemically. Your shielding gas needs to complement these traits to give you a strong, clean weld that looks great. Trying to use a gas mix meant for steel on a piece of aluminium, for example, is just asking for trouble.
Mild steel is the bread and butter of most fabrication shops, used for everything from car repairs to structural frames. It’s a forgiving and versatile material that works best with an active gas mixture containing Carbon Dioxide (CO2).
The undisputed king for general-purpose mild steel is a mix of 75% Argon and 25% CO2. You’ll often hear it called "C25" or "universal gas." This blend really does offer the best of both worlds. The Argon gives you a smooth, stable arc with hardly any spatter, while the CO2 injects the extra heat needed for deep penetration.
Tackling thicker steel sections? You might want to bump up the CO2 content to an 80/20 or even an 85/15 Argon/CO2 mix. More CO2 means more energy in the arc, which carves out a wider, deeper weld profile. On the flip side, for thin sheet metal where you’re trying to avoid burn-through, a higher Argon content like 90% Argon and 10% CO2 is the way to go.
Stainless steel demands a bit more finesse. Its signature trait is the chromium that gives it corrosion resistance. When welding, your number one job is to protect that chromium from the intense heat of the arc, which can cause it to oxidise and lose its protective magic.
This is why pure CO2 or high-CO2 blends are a terrible choice here. The carbon in the CO2 can get absorbed into the weld, leading to something called carbide precipitation. This process essentially strips the steel of its "stainless" qualities, leaving the weld vulnerable to rust down the line.
The gold standard for MIG welding stainless steel is a tri-mix gas. A very common blend is 90% Helium, 7.5% Argon, and 2.5% Carbon Dioxide. The Helium brings the heat for good fusion, the Argon keeps the arc stable, and that tiny dash of CO2 helps shape the bead without messing with the corrosion resistance.
This balanced approach makes sure the weld keeps the essential properties of the parent metal. For some jobs, a simpler mix of 98% Argon and 2% Oxygen or CO2 can also work well to improve how the weld puddle flows and give it a slicker appearance.
This simple flowchart helps visualise the initial decision-making process for your shielding gas.
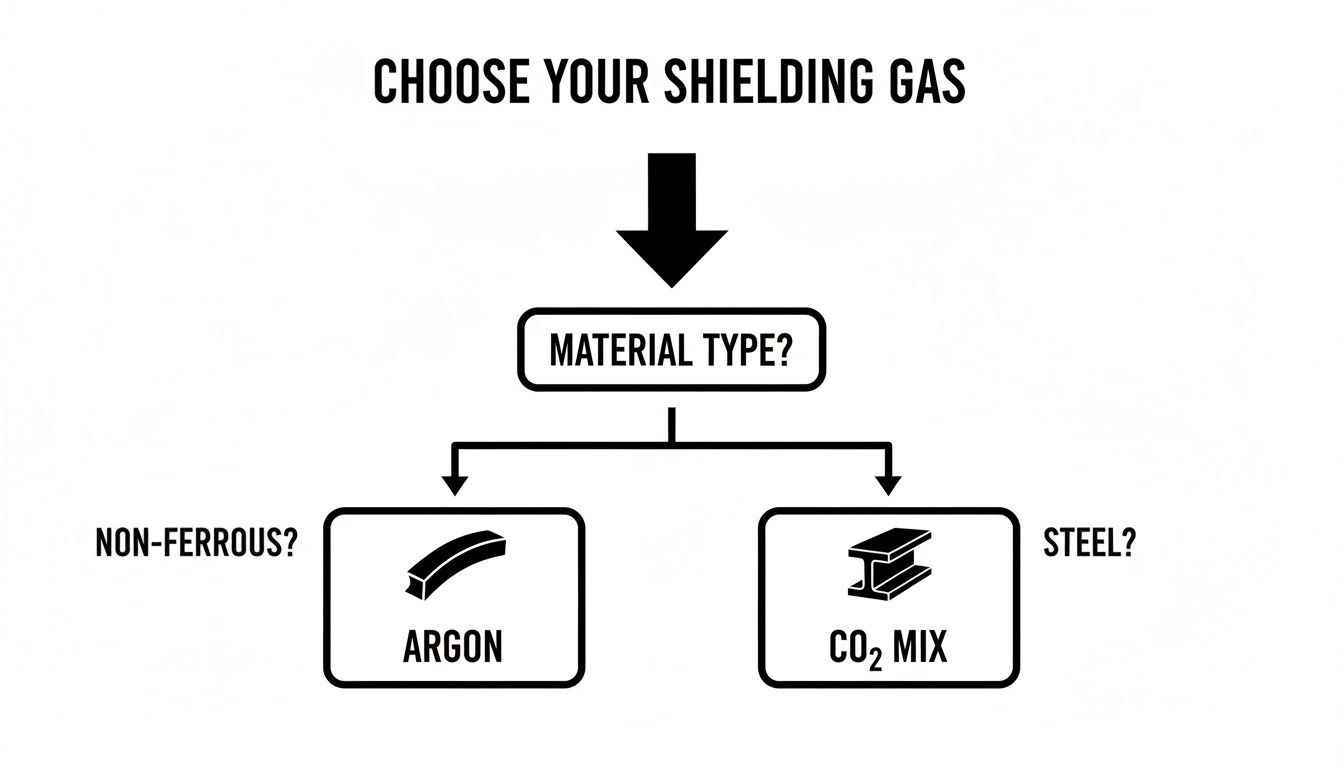
As you can see, the first question is always whether you're working with a ferrous metal like steel or a non-ferrous one like aluminium. That single decision immediately points you down the right path.
To make things even clearer, here’s a quick reference table. Think of it as a cheat sheet for matching the right gas to your project.
| Base Metal | Recommended Gas Mixture | Weld Characteristics | Typical Application |
|---|---|---|---|
| Mild Steel | 75% Argon / 25% CO2 (C25) | Good penetration, stable arc, minimal spatter | General fabrication, automotive, structural work |
| Mild Steel (Thick) | 80% Argon / 20% CO2 (C20) | Deeper penetration, hotter arc | Heavy plates, structural beams, machine parts |
| Stainless Steel | 90% He / 7.5% Ar / 2.5% CO2 | Excellent corrosion resistance, good bead shape | Food-grade equipment, chemical tanks, exhaust systems |
| Aluminium | 100% Argon | Clean, stable arc, good for thin-to-medium thickness | General aluminium fabrication, boat repairs, automotive parts |
| Aluminium (Thick) | Argon / Helium Mix (25-75% He) | Very hot arc, deep penetration, faster travel speeds | Thick plates (>6mm), structural aluminium, heavy-duty parts |
This table covers the most common scenarios you'll encounter in the workshop. Remember to always fine-tune your settings based on the specific thickness and joint type you're dealing with.
Aluminium is a whole different ball game. As a non-ferrous metal, it has extremely high thermal conductivity, which means it whisks heat away from the weld zone incredibly fast. It’s also very reactive with oxygen, quickly forming a tough oxide layer on its surface that you have to clean off before you can even think about welding.
Because of this reactivity, you absolutely must use a 100% inert gas. Any active gas like CO2 or O2 will react with the molten aluminium, leaving you with a porous, weak, and contaminated weld. No exceptions.
The go-to mig schweißen gas for aluminium is 100% Argon. It provides a beautifully stable arc and has the cleaning action needed to punch through that stubborn surface oxide layer. For most jobs on thin-to-medium thickness aluminium, pure Argon is perfect.
When you start welding thicker sections of aluminium (usually anything over 6mm), an Argon and Helium mix is a huge help. Adding Helium, typically between 25% and 75% of the mix, cranks up the heat of the arc significantly. This extra energy counteracts aluminium's rapid heat loss, ensuring you get proper fusion and can move along at a much faster pace.
The demand for these gas blends tells a story about a country's industrial backbone. In Germany, shielding gas consumption for MIG/MAG welding is massive, driven by its powerful automotive and engineering sectors. Market data shows a clear focus on CO2–argon blends for steel and pure argon or argon–helium mixes for aluminium, reflecting exactly what these industries need to build cars, machinery, and infrastructure.
To dive deeper into the active gases used for steel, check out our guide on which gas to use for MAG welding. By carefully matching your gas to your metal, you’re setting yourself up for success before you even strike an arc.
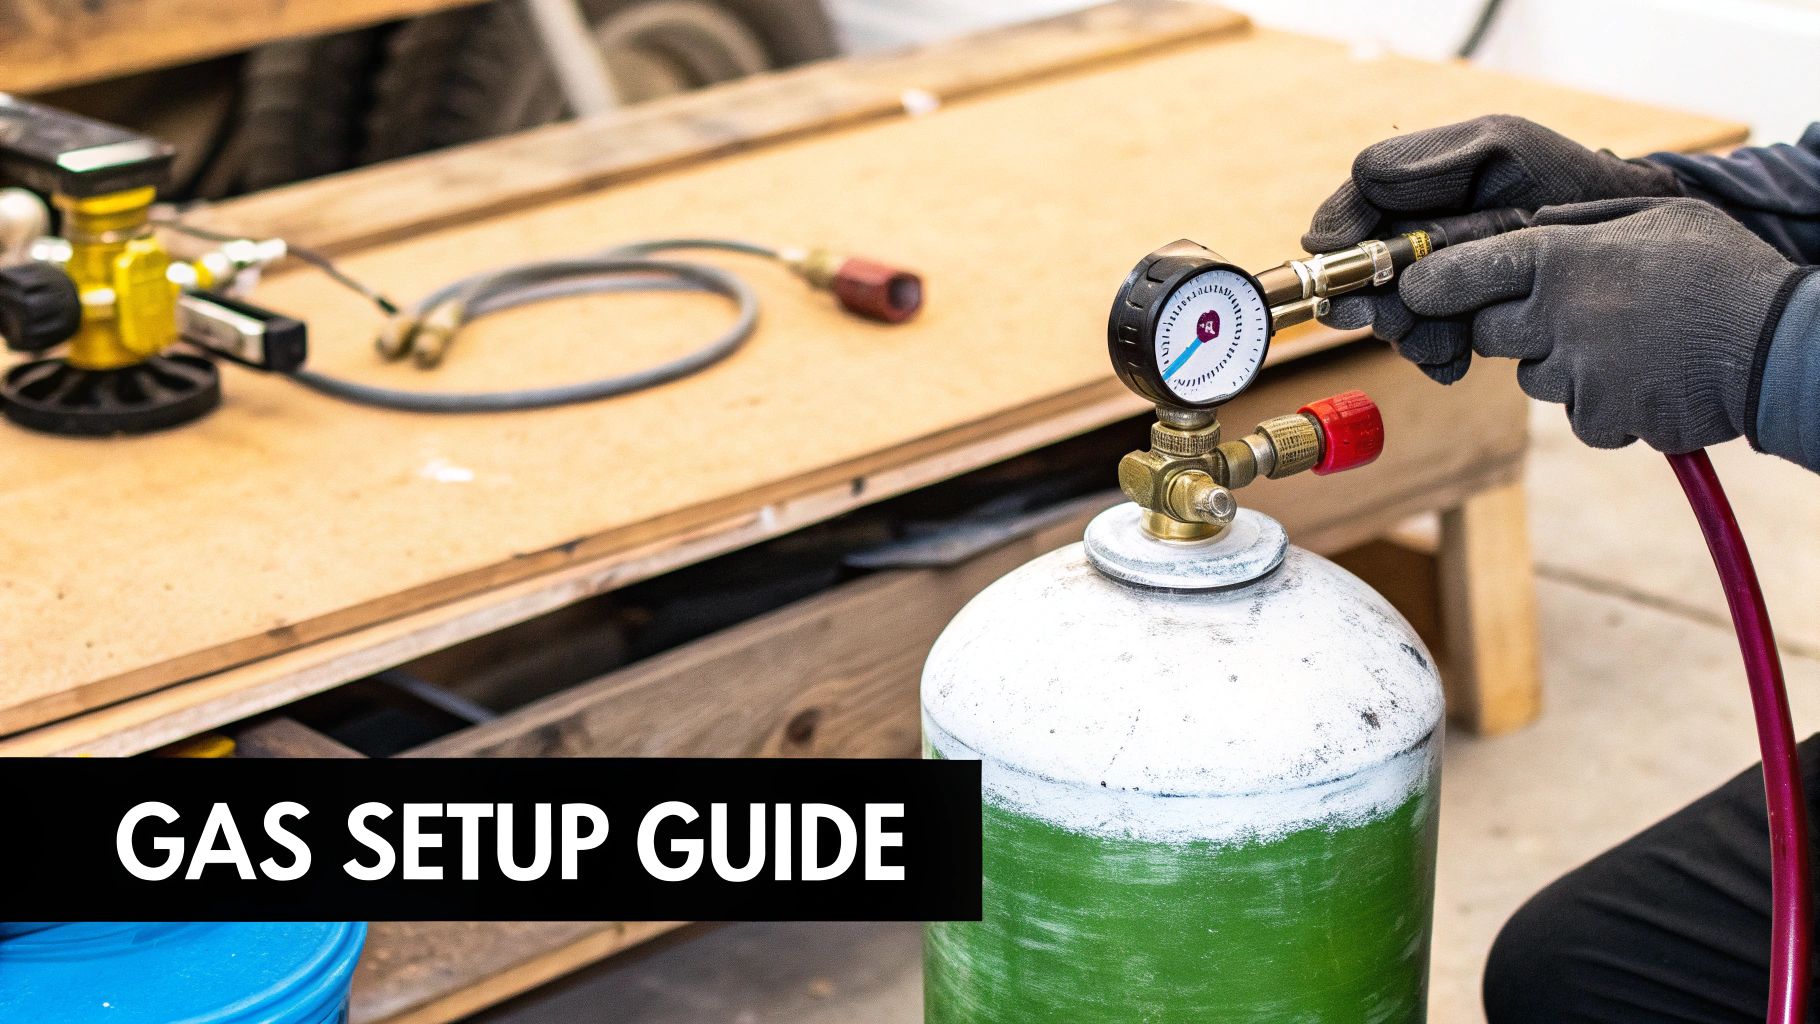
Choosing the correct mig schweißen gas is a massive first step, but even the perfect blend is useless if it doesn't make it to the weld pool properly. Think of your gas system setup as the crucial bridge between that full cylinder and a flawless weld. It’s a process where the details really matter—a small mistake can tank your weld quality or even create serious safety hazards.
This setup ensures that invisible shield is delivered just right, protecting your work and making every litre of gas count. Let's walk through the essentials, from hooking up the hardware to dialling in the flow and making sure everything is sealed tight.
The regulator is the heart of your entire gas delivery system. It’s the piece of kit that takes the immense pressure inside the cylinder—often over 2,000 PSI—and tames it into a gentle, usable flow for your welder. Getting this attached correctly is job number one.
Before you do anything else, "crack" the cylinder valve. Just open it for a split second and snap it shut again. This quick blast of high-pressure gas blows out any dust or debris that might be hiding in the valve outlet, preventing it from getting forced into your sensitive regulator.
Now, you can attach the regulator to the cylinder. The threads should engage smoothly by hand; never force a connection. Use the right-sized wrench to give the nut a firm tighten, but don't go overboard. Overtightening can easily damage the soft brass fittings. Finally, connect your gas hose from the regulator's outlet to the gas inlet on the back of your welding machine.
With everything connected, it's time to set your flow rate. This isn't a "set it and forget it" number; it’s a delicate balance. Too little gas flow starves the weld pool, letting atmospheric contaminants rush in and pepper your weld with porosity. But too much flow is just as bad. It creates turbulence at the nozzle, which ironically sucks air into the shield and wastes a whole lot of money.
A great starting point for most indoor, draft-free workshops is 10-15 litres per minute (LPM), which is about 20-30 cubic feet per hour (CFH).
Pro Tip: When you set the flow, make sure you're depressing the trigger on your MIG torch. You only get an accurate reading on the regulator's ball meter or dial gauge when the gas is actually flowing.
If you're welding outside or in a draughty spot, you'll probably need to bump up the flow a bit to push back against the air movement. Always listen to your arc. A smooth, consistent crackle is a good sign, while a sputtering, unstable arc often points to a gas coverage problem. Understanding the logistics of gas is important too, which includes knowing the difference between buying or renting gas cylinders.
Never, ever skip this step. A gas leak isn't just wasteful and expensive—it's a major safety risk, especially in an enclosed space where leaking gas can displace the oxygen you need to breathe. The old-school soapy water test is simple, cheap, and incredibly effective at finding leaks.
If you find one, immediately close the cylinder valve, bleed the pressure out of the system, and retighten the leaky connection. Then, test it again. Keep going until no more bubbles appear. This check takes less than a minute but can save you from endless welding headaches and serious hazards.
Even when you think you've got the perfect setup, a weld can still turn out wrong. It's a frustrating moment for any welder. When you see defects creeping into your weld bead, your shielding gas system is almost always the best place to start looking for the culprit.
Think of yourself as a detective at the scene of a bad weld. The evidence—tiny pinholes, excessive spatter, or a weak bead—tells a story. If you can learn to read these clues, you can quickly trace them back to a problem with your mig schweißen gas delivery and get it fixed.
Porosity is the classic, tell-tale sign of a shielding gas problem. It shows up as little pits and pinholes scattered across the surface of your weld bead, giving it a spongy look. These holes are actually tiny gas bubbles that got trapped in the molten puddle just as it froze, which creates a seriously weak joint.
The cause is always the same: something has broken the protective shield of gas around your arc. When that invisible barrier is compromised, nitrogen and oxygen from the surrounding air rush into the molten metal, and those bubbles are the result.
Here's your troubleshooting checklist:
A little bit of spatter is just part of the deal with MAG welding, but when your workpiece starts looking like it's been hit by buckshot, something is definitely wrong. Those little molten balls flying from the arc aren't just messy; they represent wasted filler metal and a lot of cleanup time.
A very common gas-related reason for extreme spatter is using a gas mix that's too "active" for your settings. Pure CO2 and blends with a high CO2 percentage (like C25) produce a much more forceful and energetic arc compared to mixes with more argon.
If the arc is too "hot" and aggressive for the thickness of your material, it's going to create a mess of spatter. A 75% Argon / 25% CO2 blend is a fantastic all-rounder for steel, but if you use it on very thin sheet metal, that arc can be too harsh. Simply switching to a mix with more Argon, like a 90/10 blend, can calm the arc right down and dramatically cut back on spatter.
So, if your spatter is out of control, take a hard look at your gas choice. If you are using a high-CO2 mix, make sure your voltage and wire speed are dialled in perfectly. Often, the easiest fix is to just switch to a blend with a lower CO2 content.
Is your arc wandering all over the place, sputtering, or making an erratic hissing sound? An unstable arc is a nightmare to control and almost guarantees an inconsistent weld with poor fusion. More often than not, this instability is a direct result of using the wrong mig schweißen gas for the metal you're trying to weld.
For instance, trying to weld aluminium with any CO2 blend is a recipe for disaster. The active gas will react violently with the aluminium, creating a chaotic, dirty, and utterly uncontrollable arc. Likewise, if you try to weld thick steel with pure Argon, you'll likely end up with poor penetration—the weld bead will just sit on top of the metal instead of biting into it. The Argon arc just doesn't have the thermal energy to dig deep.
If you're running into these kinds of problems, your first move should be to stop and double-check that your gas choice matches the base metal, just as we've outlined in this guide. Think of an unstable arc as the weld's way of screaming that it doesn't like the atmosphere you've put it in.
When your weld quality starts to dip, your gas setup is one of the first and easiest places to investigate. These common issues—porosity, spatter, and poor penetration—are often just symptoms of a simple mismatch or a leak in the system. To help you diagnose these problems quickly, we've put together a simple troubleshooting table.
| Weld Defect (Symptom) | Potential Gas-Related Cause | How to Fix It |
|---|---|---|
| Porosity (Pinholes in Bead) | 1. Inadequate gas flow. 2. Excessive gas flow causing turbulence. 3. Gas leaks in the hose or fittings. 4. Drafts blowing gas away. |
1. Increase flow rate to 10-15 LPM. 2. Decrease flow rate to 10-15 LPM. 3. Perform a soapy water leak test on all connections. 4. Shield the weld area from wind or fans. |
| Excessive Spatter | 1. Gas mixture is too "active" (high CO2%) for the application. 2. Incorrect gas for the transfer mode (e.g., CO2 for spray arc). |
1. Switch to a gas blend with a higher Argon content (e.g., from C25 to C10). 2. Ensure gas matches the intended transfer mode (e.g., 90%+ Argon for spray). |
| Unstable, Wandering Arc | 1. Wrong gas type for the base metal (e.g., CO2 on aluminium). | 1. Verify you are using the correct gas for your material (Inert for non-ferrous, Active for steel). |
| Poor Penetration / Bead Profile | 1. Gas lacks sufficient thermal energy (e.g., pure Argon on thick steel). 2. Gas is too active, creating a convex "ropey" bead. |
1. Add a small percentage of CO2 or O2 to an Argon mix to increase arc energy. 2. Increase the Argon percentage in your blend to flatten the bead profile. |
| Sooty or Discoloured Weld | 1. Insufficient shielding coverage. 2. Contaminated gas from a faulty cylinder. |
1. Check for leaks and ensure proper flow rate. 2. If all else fails, try a new, clean cylinder of gas. |
By using this table as a quick reference, you can match the symptom you're seeing on your workpiece to the most likely gas-related cause. This approach turns frustrating rework into a simple, logical diagnostic process, getting you back to laying down perfect beads faster.
Even after you’ve got the basics down, a few specific questions about mig schweißen gas always seem to pop up. This is where we tackle the common queries we hear from welders on the shop floor, aiming to clear up any lingering confusion and sharpen your practical know-how.
Let's dive into some of the most persistent questions, from whether you can weld without gas at all to the nitty-gritty of how long a cylinder really lasts.
This is a classic question, and the answer is a firm "yes and no." You absolutely cannot perform standard MIG welding (with a solid wire) without shielding gas. If you try, the molten weld pool gets blasted by the atmosphere, leading to a porous, brittle mess that isn't really a weld at all.
However, you can weld without an external gas cylinder by switching to a process called Flux-Cored Arc Welding (FCAW), which most MIG machines can handle.
So, while you can weld without a bottle of mig schweißen gas, you're technically not MIG welding anymore—you're running a self-shielded flux-core process (FCAW-S). It's brilliant for working outdoors where wind would just blow your shielding gas away, but be prepared for more smoke and spatter.
Figuring out how long your gas will last doesn't have to be a guessing game. With a little bit of straightforward maths, you can get a surprisingly accurate estimate. All you need to know is your cylinder's volume and your flow rate.
Let's run through a quick example. Say you've got a standard 20-litre cylinder pressurised to 200 bar.
Keep in mind, this calculation gives you your "arc-on" time. It's the total time the trigger is actually pulled and gas is flowing, not the hours you spend prepping and fitting up the project. Tracking this helps you plan ahead and avoid running out of gas mid-bead.
Using this simple formula lets you forecast your needs for bigger jobs and manage your cylinder stock much more effectively. No more surprise downtimes because you ran out of mig schweißen gas.
You'll often hear "MIG" and "MAG" thrown around, sometimes as if they mean the same thing. They are both types of Gas Metal Arc Welding (GMAW), but there's one crucial difference: the type of shielding gas you’re using.
MIG (Metal Inert Gas) Welding: This process uses a purely inert gas—a gas that won’t react with the molten weld pool at all. We're talking 100% Argon or maybe an Argon/Helium mix. MIG is the go-to process strictly for non-ferrous metals like aluminium, magnesium, and copper alloys.
MAG (Metal Active Gas) Welding: This process uses an active gas mixture. These are blends that start with an inert gas like Argon but have an "active" component mixed in, like Carbon Dioxide (CO2) or a tiny bit of Oxygen (O2). This active gas gets involved in the arc, stabilising it and improving penetration. MAG welding is what you’re doing when you weld any kind of steel, from mild to stainless.
So, at the end of the day, if you’re welding steel with an Argon/CO2 blend, you're technically MAG welding. If you're TIG welding aluminium with pure Argon, that's true MIG welding. While most people in the shop just call it all "MIG," knowing the difference is key to choosing the right gas for the job and getting the results you want.
For all your industrial and cryogenic gas storage needs, trust the experts. Cryonos GmbH provides state-of-the-art solutions, from transport vessels to on-site storage systems, ensuring reliability and safety for your operations. Explore our full range of products and services at https://www.cryonos.shop.